Litestar & Pulse
Tires.....Shocks....Axels....Seals....Brakes.....Steering
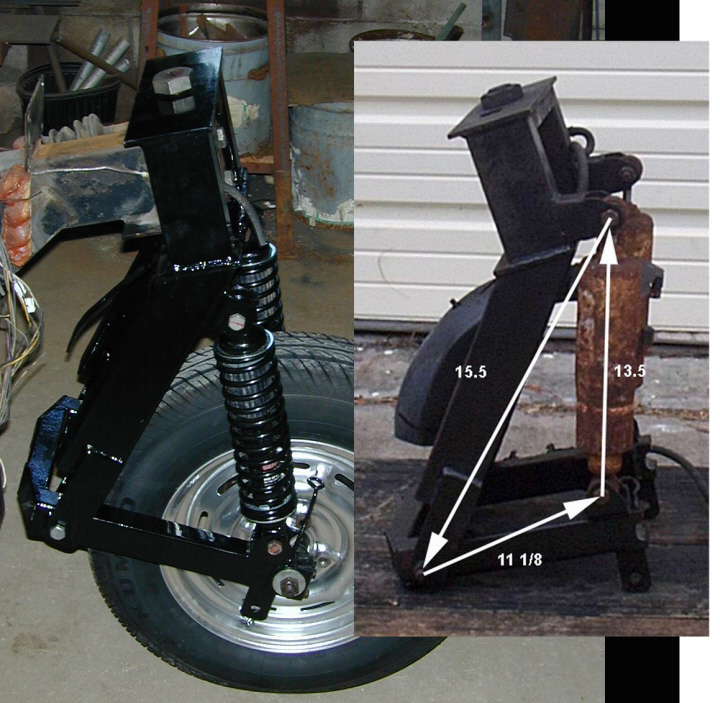
Bob Hichborn's Pulse #77
Bob Hichborn's Pulse #77
Note: Somewhere between Pulse #142 and #147, OMCC switched from coil-over shocks to air shocks.
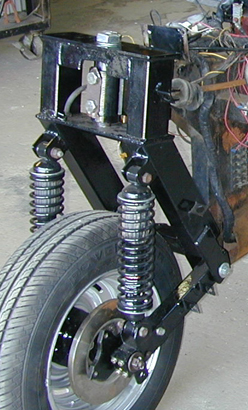
Monroe Load Leveler 54575 ...............(Coil over shocks used front and rear)
Dave Bauer switched over to Gabriel Max Air 819 (aka MA819 or 48819) on front. Best ride is about 75psi.
Gabriel Air-shocks # 729773
*AutoZone P/N 49212 (Used on Front and Rear)
Several owners have used air-shocks front and back with an on-board air compressor and dual gauge controller. Nice to be able to control ride if you have a passenger. When completely aired up, one outrigger could be as high as 7" off ground. Most guys run with on outrigger 1" to 2" off ground.
Research....AIR LIFT 25812 Load Controller II Air Compresser System.
by: Bob Cervero 06/07/03
If you have coil over shocks you will have to have someone of about your weight sit in the Pulse while you do the same adjustments. Remember, with coil overs you don't have the ability to fine tune the ride height as you go down the road. It will be a compromise.If you ALWAYS ride alone then you can set the ride height as described. If you often have a passenger, you will have to adjust the ride a little higher as a compromise. It's not hard to add air shocks to the rear only. That solves the compromise problem. Think about it. No matter what,it will probably take a couple of tries to find the best heighth. Caution: When adjusting the turnbuckles be sure to leave at least 1 1/2 inches of threaded section inside the turnbuckles!! Too little and they may break! Not good. If you find that too little thread is left in the turnbuckles then you need to adjust the inside turnbuckle that is located under the rear seat to get the additional adjustment you need.
Dave Bauer #167
Dan Marks stated that his Pulse got very unstable at about 100mph. Mine had the same problem.
This is due to the shock setup. I replaced my rear shocks with coil over shocks used on street
rods and solved this problem. The vehicle is much more stable both at high speeds and on turns.
I took mine up to 140 mph with no problems.
John Leonard.......
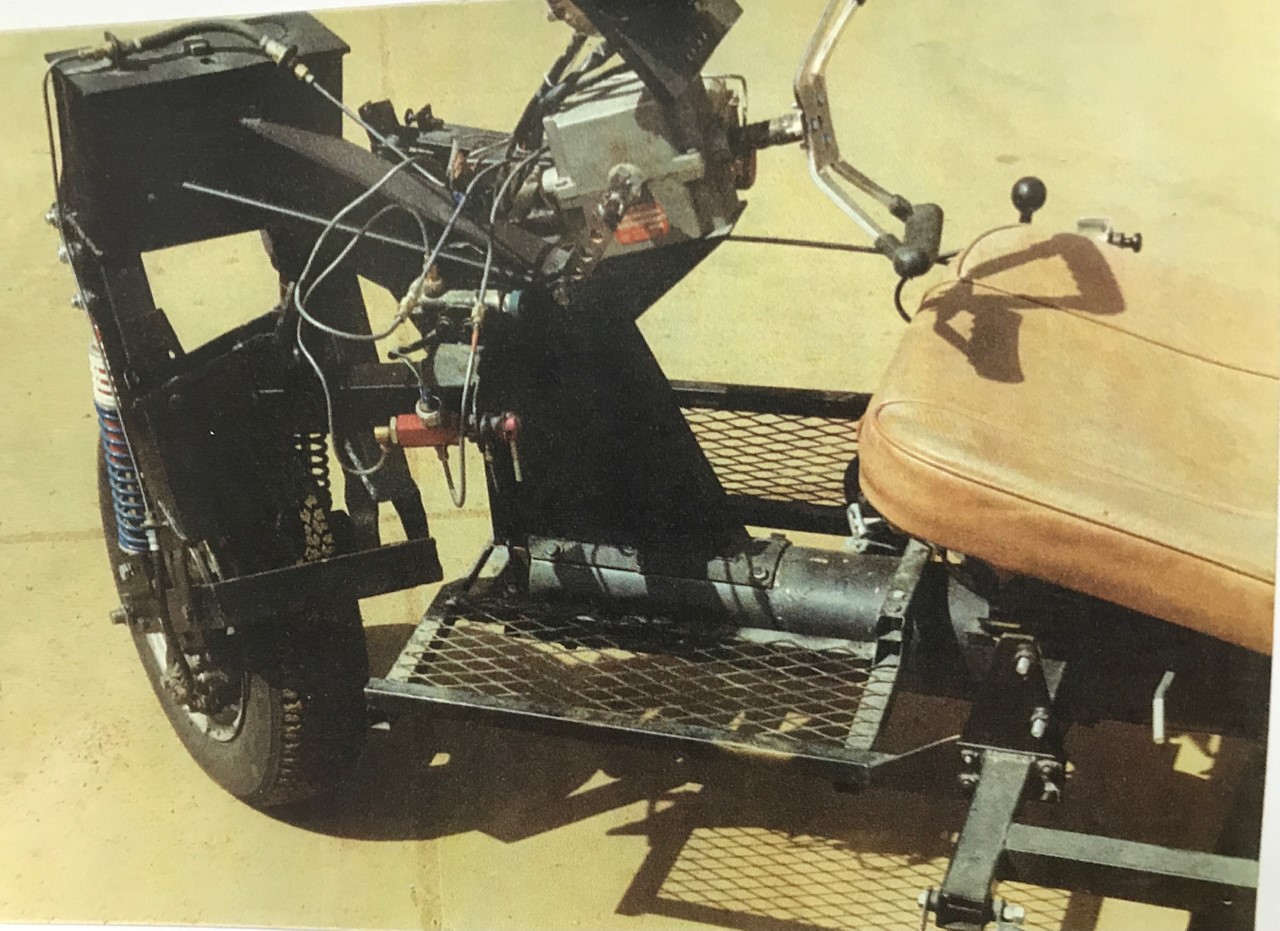
RUNNING GEAR: The suspension is basically comprised
of Gabriel automotive type air shock absorbers mounted
on front and rear swing arms.
Don Muddiman
Air-Shocks: Gabriel P/N 729733 - AutoZone P/N 49212
Gabriel Shock length compressed 13 1/4" Extended 20
Not all Pulses use the Gabriel shocks.
From what I can tell they started using the Gabriels around Pulse # 189
Pulses approximately before S/N 189 used Monroe 575 Shocks (Coiled Overload Shocks).
Gabriels will not work in place of the Monroe shocks unless you relocate the shock mounts on the Pulse. This would require cutting and welding. The Monroes are shorter in height than the Gabriels Also the Gabriel shock mounting bushing will have to be cut to length to fit the Pulse shock mounts.
Pulse # 199 has air-shocks front and rear. I have an onboard air pump, pressure gage and switching valve to monitor and or adjust front or rear shock pressure while driving.
I have been driving my Pulse for over several months during 2003 and racked up almost three thousand miles driving back and forth to work. I commute twenty-five miles one way. Eighteen miles of that commute is driving at speeds from 70 to 80 miles an hour. After becoming very confident driving this vehicle at highway speeds I have been playing with raising and lowering the air-shock in which rises or lowers the body/out-riggers. I have found the Pulse is best driven with the out-riggers just touching the ground. When making a normal ninety-degree or more turn in a Pulse with air-shocks, the out-rigger will lift six inches or more depending on the speed and pressure in the air-shocks. After completing the turn the body/out-riggers stay high until the load comes back on the shocks and has time to settle. During this time the Pulse will teeter -totter from out-rigger to out-rigger, creating an annoying, unwanted and possibly dangerous situation.
What causes this is the air-shocks (mainly the rears) unloading/extending from the side G loads in the turn. This is also confirmed by watching the air-shock pressure gage drop drastically. Once the air-shocks are unloaded/extended it takes a few seconds for them to settle back to normal ride position. The air-shocks being under pressure are actually helping (pushing) to assist the excessive roll problem. Bob Cervero has Pulse #61 with coil shocks and it does not exhibit this problem. One way I have found to help over come this problem is to lower the air pressure in the shocks. This has the major draw back of increasing the load and friction on the out-rigger tires. My first set of out-rigger tires lasted less than four hundred miles which is another problem in its self.
So how do we fix this over roll problem? Bob and I were discussing the problem and he came up with and idea of limiting the swing-arm travel. With that in mind the ideas starting flying. One idea would be to attach a right-angled rod by the upper shock mount and provide sliding blocks on swing-arm that the rods would travel through. The very ends of the rods would be threaded for adjustment and have rubber bumpers to soften the end limit of the extension. The adjustment would allow you to set the total ride height and control the lift of the out-rigger tire.
Ok now I'm going to start some controversy about the Pulse. My personal finding with owning a Pulse is this vehicle was never designed to drive on two wheels down the highway. The geometry of the production Litestars/Pulses front ends are not set up to do this. There is no way you can get feed back from countering steering like you do from driving a motorcycle. The Pulse uses a gearbox with reduction for steering, which completely eliminates any counter-steering feed back.
Notice the position of the front shock. Most rake angles
for motorcycles are
approximately 30 degrees. The Pulse actually has a negative rake angle.
I have tried many times at highway speeds to do this and found it to be dangerous. If you have ever ridden a motorcycle and left the kickstand down and tried to make a turn you would understand. I have been able to keep the Pulse on two wheels for a short time. It's very hard to do this because of wind conditions, your body weight changing slightly to one side or other cars passing and creating wind turbulence. Riding on two wheels means at sometime the out-rigger tire is going to touch. When this happens at highway speeds things become very dangerous, the teeter-totter from out-rigger to out-rigger can become very rapid and excessive. Over controlling when this happens would result in a disaster at this speed.
This also brings me to why the out-rigger tire wear is high. When driving with the out-rigger tires just touching at highway speeds creates excessive wear on them. Even the very slightest turn scuffs the out-rigger tire from side to side. Because of the outrigger tire location the tires will always scuff sideways when you turn. This can best demonstrated by just pushing the Pulse while turning and hearing the outrigger tire scuffing. Air pressure had made a major difference in tire wear so far. I have tried several tire pressures with the current set of tires and hope to get about 1200 miles before I have to replace them again. I am currently this set of tires at 13psi and will try 10psi on the next set of out-rigger tires. The first set of tire I was running 65psi and got less than 400 miles on them.
Other Notes
Coil-over springs kits and standard automotive shocks would not allow for the major differences in loads (passenger, gas, carried items) but does help in the rebound as the standard coiled shocks installed on some production units. By using my onboard adjustable air-shocks I have found the best shock position to be with as little load as possible on the out-riggers tires. This is hard to judge unless you raise the shock height while driving until you can teeter-totter then just lower the shocks until both out-rigger tires just touch. With the on board air-shock pressure gage this allows you to preset your normal load setting with out having to do this each time. The only time I have found more load on the out-rigger tires helps is when there is a heavy cross-wind driving at highway speeds. Also I have found Pulse handles better with a passenger load driving at highway speeds. One other plus for having air-shocks is when backing up by pushing or using the electric reverse unit. It's much easier to move the Pulse backwards when one out-rigger tire is lifted. This is especially noticed when making even a slight turn in reverse. Using coiled shocks and changing loads does not allow you to adjust the delicate load requirements to minimize the out-rigger tire wear. I have also found that the front air-shocks require only an initial adjustment for an loaded or unloaded passenger load. I run the front wheel height between 10 and 11 inches. This height is measured using a ruler from the ground level to the front body edge of the front wheel cavity, taken at the center of this opening. The rear shocks do the most for load adjustment because of the loaded position of the passenger and storage compartment.
I have never checked the toe-in because there is no adjustment to correct it, but you can control the camber of the out-riggers to help decrease the wear at the center of the tire. The U.S. DOT defines motorcycles as "any vehicle that maintains not more than three wheels in contact with the ground and has a saddle seat for the rider." Is the Litestar/Pulse a motorcycle? I find the Litestar/Pulse design runs mainly on four wheels and sometimes rides on three when you are turning. This is why the out-rigger tire wear is so high they are almost always in contact with the road. I have a demonstration video that was made for marketing the Pulse and you can see that it rides on all fours when going down the highway and lifts a tire in a turn.
I am also in the process of building a high point tire balancer for the eight-inch out-rigger tires. Automotive tire balancers were never designed for this small of a tire and they do a poor job of balancing them. I will post more on this when it is completed.
Learn more about rebuilding Front Fork and Steering
Don Muddiman
Cone roller bearings are used in the Pulse and are the same for the front and rear axles. This cone roller
bearing is a combo bearing and seal. The seal is bonded to the race of the bearing. So to replace the seal
you need to replace the bearing. The cone roller bearing replacement is a TIMKEN L44600L. I highly
recommend replacing the cone roller bearing with its matching race. Never install a new bearing with
an old race or vice versa. Also dont forget to pack the bearing with grease before installing it.
I would replace the front end bushing with a bronze or Oilite bushing. Your local machine shop can turn these out fairly cheap. The bushings are carrying about 50% of the total load (weight) of the Pulse and the loads are increased when braking is applied. Using rubber, Teflon or any similar type material will pound out in a very short time and created steering problems. As with other Pulse problems the factory design was not always the best solution.
BRAKES
Bob Cervero....Pulse #61.
My calipers are from a 1983-1987 Renault Alliance. The pad stock number is MD218.
Don Muddiman
Disk Brake Caliper: 1987 AMC Alliance (Passenger Side) - AutoZone P/N C945
Disk brake calipers are the same front and back.
Below from Chad....Pulse #220.....Oct. of 2008
I've gone through the Litestar/Pulse Autocycle Club parts list several times and based on the list, I have ordered a replacement master cylinder, caliper, rotor and pads, air shocks, tire and wheel bearings. I ordered the following front brake parts:
1985 Dodge Omni brake rotor ( Duralast 5328)
1985 Amc Alliance brake caliper (Fenco Reman C945)
1985 AMC Alliance front pads (Duralast MKD218)
1983 Ford Fairmont Brake Master Cyl ( TS- 10 1763)
Timken L44600LA bearings
While rebuilding #220, I replaced all the brake components including master cyl., caliper, pads and all hard and rubber lines. Unfortunately, I could not come up with part #'s for the lines and when I tried to match up the front rubber line from an autoparts store it did not fit. I believe the problem was in the caliper end fitting.
MY PULSE (and I say that as a disclaimer as we have found out that no two are truly the same) had an original caliper that used a standard fitting on the rubber hose and the replacement caliper needed a 10x1.00mm fitting. Although a standard fitting will fit into the new caliper, it will strip out as you go to finish tightening.
Anyway, after repeatedly trying to match up a hose to no avail. I called Bob at Magill's Quality Radiator in Tucsan, Az (520-690-0903 or http://www.magillsquality.com/ ).
They make custom brake hoses and lines. If you can tell him exactly what you need (length, ends etc.) he can make them up for you. Better yet, if you send him your old ones, he will duplicate them exactly. All his brake hoses are made to Meet D.O.T Specifications.
Turn around time was immediate, as he made them for me the same day as I talked to him. I had to go with custom made hose for the rear anyway to mate up to the Ninja caliper of the donor bike. I also I sent him a picture of my Pulse, so he knows what they are.
He was very informative and a real pleasure to deal with.
From Pulse #31 owner in Nov. 2009:
Just had all new brake hoses manufactured for my pulse #31.
There are a total of 5 rubber hose assemblies. Three (3) on the front and two (2) on the rear. All of my steel tube lines were 3/16 tube with a 3/8-24 nuts (maybe not all were 3/16" tube).
My hoses were made using BrakeQuip components. The catalog links are below.
FRONT HOSE #1, Hose from front caliper to lower suspension arm HFMM03 (M10x1), 12" hose, HFIF07 (3/8-24 Female).
FRONT HOSE #2, Hose from lower suspension arm to upper steering assembly, HFIF07, 9" hose, HFIF07.
FRONT HOSE #3, Hose from steering arm assembly to frame neck top, HFIF07, 13" hose, HFIF01. Note: Hose fitting near frame neck top did not have 5/8" hex in the mount bracket. Other ends had hex??
BACK HOSE #1, Hose from rear caliper to rear swing arm, HFMM03, 12" hose, HFIF07.MO< BACK HOSE #2, Hose from rear swing arm to rear of frame assembly, HFIF07, 9" hose, HFIF07. All hose material was 1/8" DOT Rubber, SAE J1401.
http://www.brakequip.com/fitpdf/impfem_clip.pdf - Female Fitting
http://www.brakequip.com/fitpdf/metric_male.pdf - Male Metric Fitting
I used http://www.brake-hose.com/ to make the hoses. If you ship your old hoses, they will manufactured copies. Mine were approx $25 - $30 each. You can also find a vendor in your area on the brakequip website:
http://www.brakequip.com/maps.html
My calipers are from a 1984 (and other years) Renault Alliance, front right (P/N 19-556 Cardone). The HFMM03 uses a copper washer to attach to the calipers. This caliper's port hole is metric! M10x1 threads. The Dogde Omni calipers do not fit on my pulse.
I also replaced the brake rotors. Mine were P/N YH141268 made by "Wearever".
On the hoses cited in an earlier post on message board (Jim Finch Oct 2008) - Raybestos, BH35019, this assembly has 7/16-24 female fittings on each end. Raybestos, BH36549, this has the 7/16-24 female on one end and the 3/8-24 male on the other.
Although this will fit into the port of the Renault caliper, it will be somewhat loose. The correct fit is the M10x1. I would assume that at some point steel lines were changed to 1/4" tube in order for the BH35019 to correctly fit on Jim's Pulse?
Also, other calipers (Omni??) may not have a metric port allowing the BH36549 to properly fit? Just my 2 cents.
Hopefully this info will help someone in the future correctly obtain brake hoses/calipers/rotors!!
FRONT.............145 or 155 SR 13 Radial (*Recommend Michelin 155SR13 XW4 Black wall, this is a symmetrical tire)
According to Bob Hichborn.......
Name of automobile - Horizon Omni
Year - 1979 - 1990
OE size - 13 x 5
Bolt - 4 x 100
Lug Nut - 12mm x 1.5
CB (center bore) - 57.1
Offset - +40
This spec is also found on the Chevette and Audi Fox 1976 - 1984
The 1988 - 1993 Pontiac Lemans matches this spec except the wheel width is 5.5 instead of 5.0. So it may fit, depending on your shock/tire clearance.
I'm in the process of verifying this info, by finding some of these vehicles. I also noticed that with the original tire/wheel/and hub, that the distance between the tire and springs is not equal on both sides. This means that the wheel mounting plate on the hub was off by about 1/4 inch when first designed, but never fixed. If anyone gets a chance, try making this measurement and see if my evaluation holds on other Pulses.
Several owners have different ideas on changing the front tire. Read and print off.
Change Front Tire.....Steve Schmidt
******Jack up front end....just behind front tire
******Remove two cotter pins on front axel. 'LOOSEN' all nuts. (NOT SHOCKS) Even the four lug nuts on the rim. When everything is loose, remove brake rotor. 4 Lug Nuts must be loose to get the rotor off. Use a bungee to hold rotor from breaking brake line.
******Carefully remove 4 bolts in each of two end blocks on forks. Its a good idea to have help holding the tire to when removing tire because of the weight and to slip off the speedo head which is fragile.
******When replacing wheel, make sure that you are very carefull with bearings and that the speedo head lines up with the metal ring with the tabs on it.....or your speedometer will not work.
******Loosely tighten all bolts and nuts. Replace brake rotor and tighten. Then tighten the two large axel nuts until the will not rotate and then back them off. Tighten eight bolts on the end blocks. Then tighten 4 lug nuts. Replace cotter pins.
Front Tire Change......Steve George
If the tire looks questionable at all or even suspect, worn it wouldnt be a bad idea to change it and save the future grief of changing on the road sometime. I changed both of mine even though the Odometer showed 19 miles.
First go buy a good sissor jack and a couple of towels (folded) to put on it jack right behind the wheel on the body where the frame tube is covered with fiberglass, use another jack or ramp to steady the outrigger.
Get the Pulse up in the air, remove the lower shock bolt to lower the wheel even further and remove the wheel axel, brake, and wheel.
When placing the wheel back on, what I did was put the assembly back together, then lowered the machine back down until the shock/spring bolts lined up and then put them in.
While your wheel is off check the head bolts up inside they are the one that attach the front steering to the frame. These have come loose on mine and I have had to safty wire them.
Steve Cole
I just thought I would share the procedure I use to remove the front wheel on my 1986 pulse #195. Using this procedure the wheel comes off in about 8 minutes without disconnecting the brake system hydraulics. (Left and right are from drivers orientation.)
1. Place jack under vehicle and lower air shocks all the way. This limits the travel of the wheel when the Pulse is raised preventing the speedometer cable from being stretched excessively, I learned this the hard way.
2. Raise Pulse until just before the wheel leaves the ground, remove the lug nuts that hold the wheel to the hub, Pull the wheel to the right side away from the brake rotor. If wheel rotates while breaking loose the lug nuts, lower vehicle a small amount. Moving the wheel first eliminates the need to disconnect the brake lines.
3. Remove the brake caliper mounting bolts They go directly through the brake caliper into the caliper bracket, slide the caliper off of the rotor and lay aside, leave brake lines attached, do not touch the brake pedal after caliper has been removed, support if required to prevent brake line damage. Mine lays on the ground with ample slack in the line.
4. Remove the two brake caliper bracket bolts. They go through the swing arm just behind the axle nut.
5. Remove the cotter pins from both axle nuts and remove axle nuts.
6. Put wheel back on studs and replace a lug nut hand tight. This will keep the hub and bearing assembly from falling during the next step.
7. Raise Pulse until the wheel just clears the ground.
8. Remove swingarm cap bolts and caps. paying attention to their orientation. May require seperating caps with a screwdriver or light tapping with a hammer. Cap on right side has eyebolt welded to it to hold speedo cable so cap will not com off all the way, just move it far enough to clear the axle.
9. Pull the wheel and axle forward toward front out of swing arm, lower wheel to the ground, remove spacer and speedometer drive off of axle. Lowering vehicle may help removing spedometer drive if cable is too tight, by allowing wheel to raise into Pulse. I find this to be easier than lifting the wheel.
10. Remove lug nut from wheel and withdraw hub from wheel, hold axle in hub from the left side as it will fall out from the left side, with the left bearing and could get damaged. You can also just raise vehicle and remove wheel and axle as one piece. Keep in mind the axle and left bearing can fall out on the left side if not held, or removed right side down.
11. Wheel can be pulled out from under vehicle.
12. When reassembling, a "C" clamp may be required to compress the brake caliper. I haven't figured out how to determine the correct amount to tighten the right axle nut, this one controls how tight the bearings are, if it is too loose they will turn on the axle and damage it, if too tight the bearings and or cups could be damaged.
The method I use is....reassemble everything, tighten the swingarm caps making sure the speedo drive and spacer are fully pressed against the bearing. The spacer on mine does not extend enough for the nut to put pressure directly on it, I think that would work better, but I tighten the nut against the swingarm, which is clamped down on the spacer, which in turn pushes the speedo drive into the bearing.
Tighten the left axle nut. Tighten the right axle nut as previously mentioned rotating the wheel until the seal/bearing stops spinning with the wheel these should stay stationary.
Changing the Front Tire................ Bob Hichborn
On a motorcycle, you would have an axle with a nut on one side. First remove the nut, then pull the axle thru the wheel hub, which allows the tire/wheel to be taken somewhere for tire replacement.
On the Pulse, you loosen the nuts on both sides, but then remove the 4 smaller bolts that attach the axle clamps. Once they are off the wheel/tire drops down. Be careful not to let the speedometer cable to get pulled out, if the tire should suddenly drop from any distance. You may or maynot have to remove the brake caliper to get the wheel/tire assembly out.
At this point you can remove the 4 nuts that hold the tire to the "hub" (the part that houses the bearings and also attaches to the rotor.)
Your Host, Steve Schmidt
Last Update: 3-20-22......
This is a personal
website and is not affiliated with the designer, manufacturer or any company officials/employees.
Disclaimer:
Litestar Pulse Website is provided to you free of charge, "as is."
The best efforts to maintain accurate Litestar Pulse
Website history, information, repair tips and content, however, it is
not responsible for the content of its information, opinion providers.
You should not assume that Litestar Pulse Website is error-free and
makes no guaranties as to the accuracy, currency, content, or quality
of any such information.
Copyright 2020 © All rights reserved